In our increasingly connected world, earbuds and headphones are more than just tech accessories; they’re essential companions for work, play, and everything in between. But let’s be honest – when was the last time you gave your precious audio gear a proper clean? If you’re like most people, the answer might be, “Uhm… never?” You’re not alone, and it’s time to change that. Dirty earbuds aren’t just unsightly; they can impact sound quality, harbor bacteria, and even shorten the lifespan of your devices.
At Striding Tech, we believe in getting the most out of your gadgets, and that includes proper maintenance. Today, we’re diving deep into the often-overlooked art of cleaning your earbuds and over-ear headphones, transforming them from gunk-laden grime magnets into pristine audio powerhouses. Get ready to revitalize your listening experience!
Why Earbud Hygiene Isn’t Just for Show
Let’s talk earwax. It’s a natural, protective substance produced by your ears, designed to trap dust, dirt, and other foreign particles. While crucial for ear health, it also means that every time you pop your AirPods Pro or other earbuds into your ears, you’re transferring some of that earwax – along with skin oils and environmental debris – directly onto your devices. Over time, this buildup can clog speaker grilles, muffle sound, reduce volume, and even interfere with charging contacts.
Beyond performance, there’s the hygiene factor. Warm, moist environments (like inside your ear canal or a charging case) are prime breeding grounds for bacteria when combined with organic material like earwax. Regular cleaning isn’t just about aesthetics; it’s about maintaining both your health and the optimal function of your expensive audio gear.
Your Cleaning Arsenal: Essential Tools
Before you embark on your cleaning mission, gather your supplies. You won’t need anything fancy or expensive; many of these items you might already have lying around the house.
- Soft-Bristle Brush: A clean, dry toothbrush is surprisingly effective. Its fine bristles can reach into tiny crevices without causing damage.
- Distilled and Deionized Water OR Isopropyl Alcohol (IPA): For stubborn gunk that dry brushing can’t dislodge. IPA evaporates quickly and is safe for electronics, while distilled water ensures no mineral deposits are left behind. Avoid tap water, which can contain minerals and impurities.
- Microfiber Cloth: Essential for drying and polishing without leaving lint or streaks.
- Toothpicks or Loop Tools: For carefully prying out larger, more stubborn pieces of wax or debris. Specialized pop-out tools with metal nibs can be particularly effective for snagging tough residue.
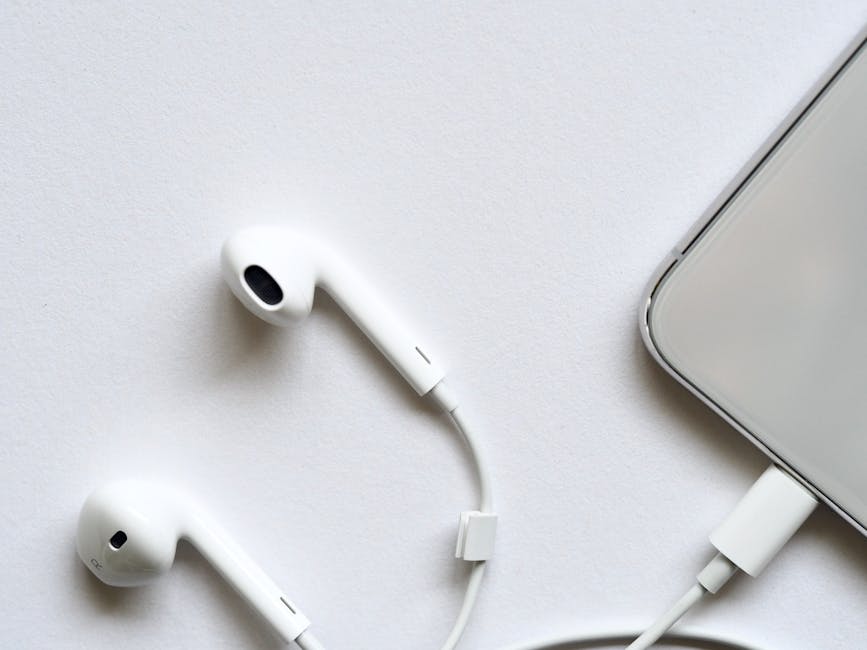
Step-by-Step: Cleaning Your Earbuds (Like AirPods)
This method applies to most in-ear earbuds, including popular models like Apple AirPods and AirPods Pro. Always start gently and increase intensity only if necessary.
1. The Dry Brush Initial Sweep
Start with your soft-bristle brush, completely dry. Gently brush the speaker grilles, microphone ports, and any other openings on your earbuds. Use short, light strokes to dislodge surface-level earwax, dust, and lint. You’ll often be surprised how much comes off with just this initial step.
2. Tackling Stubborn Grime with Liquid
If the dry brush isn’t enough, it’s time for a touch of liquid. Dip your brush *very lightly* into distilled water or isopropyl alcohol. The key here is “very lightly” – you want just enough moisture to dissolve the gunk, not to soak the earbud. Gently brush the affected areas again. The liquid will help break down the stickier, more embedded wax. Immediately follow up with a dry part of your microfiber cloth to absorb any moisture.
3. Extracting the Big Stuff
For any large, hardened pieces of earwax or debris stuck deep in the speaker grilles, carefully use a toothpick or a specialized loop tool. Be extremely gentle and precise to avoid pushing the gunk further in or scratching the delicate components. Think of it more as “scooping” than “poking.” If using a metal-nibbed tool, ensure it’s clean and sterile.
4. Exterior Shine and IP Ratings
Many modern earbuds boast an IP (Ingress Protection) rating, signifying their resistance to dust and water. This means for general exterior gunk (like smudges or sweat), you can often run them under a very light stream of water or wipe them down with a damp cloth, then immediately dry them thoroughly with a microfiber towel. Always check your specific model’s IP rating and manufacturer guidelines before exposing them to water, and avoid getting water near charging ports or open seams.
5. The All-Important Dry
After any liquid application, ensure your earbuds are completely dry before placing them back in their case or using them. Use your microfiber cloth to wick away all moisture. If possible, let them air dry for a few minutes in a clean, dust-free environment. Moisture is the enemy of electronics, so patience here is key.
Beyond the Buds: Cleaning Over-Ear Headphones
Over-ear headphones have different cleaning considerations. While you might use a slightly damp cloth (with distilled water or IPA) and a soft brush for exterior surfaces and earcups, you’ll want to be extra cautious around drivers and internal electronics. Keep liquids away from charging ports, button seams, and the areas where cables connect. For fabric ear pads, a very lightly damp cloth can work, but for leatherette, a specialized electronics cleaner or a mild soap solution (applied to the cloth, not directly to the headphones) followed by a dry wipe is best. The goal is to keep them as dry as possible.
Breathing New Life into Old Gear: Replacement Parts
Sometimes, cleaning isn’t enough, especially for older or heavily used headphones. Many brands, including Apple, offer replacement eartips, ear pads, and even headbands. Swapping out worn-out foam or silicone tips can make an older pair of earbuds feel brand new, improving comfort, hygiene, and even sound isolation. It’s a simple, cost-effective way to extend the life and enjoyment of your favorite audio companions.
Pro Tips for Ongoing Maintenance
- Regular Wipes: Make it a habit to quickly wipe down your earbuds with a dry microfiber cloth after each use.
- Case Cleaning: Don’t forget the charging case! A dry brush and a quick wipe can prevent gunk from building up inside, which can then transfer back to your earbuds.
- Store Properly: Always store your earbuds in their charging case when not in use. This protects them from dust and debris.
- Avoid Sharing: While sometimes unavoidable, sharing earbuds increases the transfer of earwax and bacteria.
Recent Tech Stories
- Nvidia Unleashes 12GB RTX 5070 Mobile: More Memory for Modern Demands
- Meta’s Nuclear Option: Will New Mexico Be The First State To Lose Access To Facebook And Instagram?
- The Hidden Toll: AI, Clean Energy, and the Rise of Global “Sacrifice Zones”
- America’s Energy Paradox: Record Production, Rising Prices
- Apple’s N50 Smart Glasses: Marrying Style and Seamless Ecosystem Integration